Merging vendors in QuickBooks is a powerful practice that can help simplify your financial transactions and eliminate duplicate entries. Whether you’re using QuickBooks Online, QuickBooks Desktop 2018, 2019, Accountant Edition, or Enterprise versions, this article will guide you through the process of merging vendors. Before diving in, it’s essential to understand the concept of merging vendors and the benefits it offers.
What Does it Mean to Merge Vendors in QuickBooks?
Merging vendors in QuickBooks involves consolidating multiple vendor transactions and eliminating duplicate entries from the vendor list. By merging vendors, you can enhance organization and easily locate specific transactions associated with a particular vendor or customer. This process streamlines your financial records and improves overall efficiency.
The Benefits of Merging Vendors in QuickBooks:
- Consolidation of Transactions – Merging vendors allows you to consolidate all transactions related to a vendor, avoiding the need to input them repeatedly. This saves time and ensures accurate financial reporting.
- Removal of Duplicate Entries – Duplicate vendor entries can create confusion and complicate your bookkeeping efforts. By merging vendors, you can eliminate duplicate entries and maintain a clean and reliable vendor list.
Important Tips Before Merging Vendors in QuickBooks
Before you proceed with merging vendors in QuickBooks, consider the following tips to ensure a smooth and error-free process:
- Backup Company Files – Prior to merging vendors, always create a backup of your QuickBooks company files. This precautionary step ensures that your data is safe and retrievable in case of any unexpected issues.
- Switch to Single-User Mode – To avoid any potential conflicts during the merging process, switch QuickBooks to single-user mode. This ensures that you have exclusive control over the merging operation.
- Disable Multi-Currency Option – If you have enabled the multi-currency option in QuickBooks, make sure to disable it before merging vendors. Merging vendors with different currencies can result in data inaccuracies.
- Exclude Specific Vendors – Certain types of vendors should not be merged, such as direct deposit vendors, vendors paid via online banking, tax authorities vendors, and tax exempt vendors. Keep these vendors separate to maintain accurate records.
- Irreversible Action – It’s important to note that merging vendors in QuickBooks is a permanent action and cannot be reversed within the software. Ensure that you carefully review and validate the vendor details before proceeding.
- Merge Accounts When Necessary – Only merge vendor accounts when it is genuinely required. Avoid unnecessary merges to maintain clarity and accuracy in your financial records.
How to Merge Vendors in QuickBooks Desktop?
Merging vendors in QuickBooks Desktop can be done through various methods depending on the version you are using. In this section, we will guide you through three different methods for merging vendors in QuickBooks Desktop 2018 and QuickBooks Desktop 2019.
Method 1: How to Merge Vendors in QuickBooks Desktop 2018?
To merge vendors in QuickBooks Desktop 2018, follow these steps:
- Open QuickBooks Desktop 2018.
- Navigate to the “Vendors” menu.
- Select “Vendor Center.”
- Locate the vendor’s name you want to merge.
- Right-click on the vendor’s name and choose “Edit Vendor.”
- Copy the vendor’s name.
- Click “Cancel” to return to the Vendor Center.
- Right-click on the name of the vendor you wish to merge.
- Select “Edit Vendor.”
- Replace the vendor’s name with the one you copied in step 6.
- Click “OK.”
- Confirm the merge by clicking “Yes.”
By following the step-by-step instructions provided in this article, you can efficiently merge vendors in QuickBooks Desktop 2018.
Method 2 – How to Merge Multiple Vendors in QuickBooks Desktop 2018 and Below?
If you need to merge multiple vendors in QuickBooks Desktop 2018 or earlier versions, follow these steps:
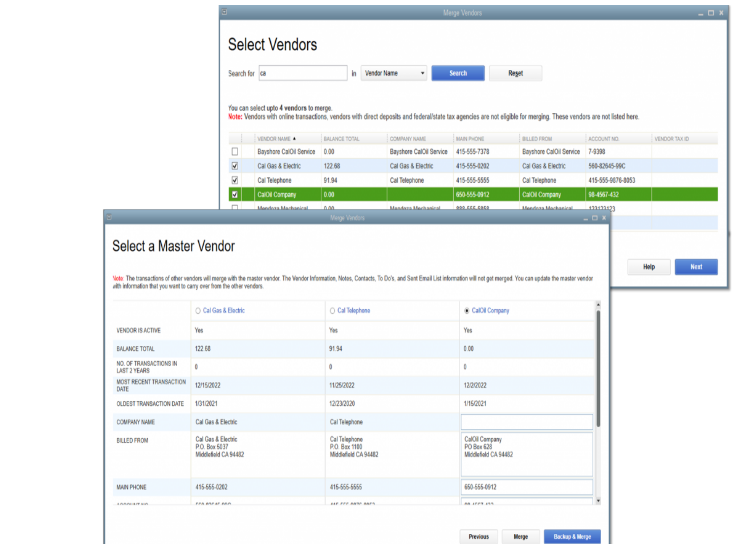
- Begin by choosing the “Master Vendor” that you want to retain as the primary vendor.
- Select up to three vendors that you want to merge with the Master Vendor. These vendors’ information and transactions will be merged into the Master Vendor.
- Decide which information you want to retain from the other vendors and migrate it to the Master Vendor. This may include contact details, addresses, payment terms, etc.
- It’s crucial to create a backup of your QuickBooks company file.
- Once you have made all the necessary decisions and created a backup, initiate the merging process. The selected vendors’ details and transactions will be migrated to the Master Vendor.
You will receive a completion message indicating that the merge has been successfully executed. The location of the backup file will also be provided for your reference.
QuickBooks Desktop 2018 and earlier versions offer the capability to merge multiple vendors. By following the step-by-step instructions outlined in this section, you can consolidate multiple vendors into a single Master Vendor.
Method 3 – How to Merge Vendors in QuickBooks Desktop 2019?
Merging vendors in QuickBooks Desktop 2019 can be done through two options: QuickBooks Desktop Accountant Edition and QuickBooks Desktop Enterprise. Follow the respective steps outlined below for each option.
Option 1: Merging Vendors in QuickBooks Desktop Accountant Edition?
To merge vendors in QuickBooks Desktop Accountant Edition, follow these steps:
- Launch QuickBooks Desktop 2019.
- Go to the “Merge Vendor” window.
- Navigate to the “Accountant” section.
- Choose “Client Data Review.”
- Click on the “Merge Vendors” button.
- Select the vendors you want to merge.
- Click “Next.”
- Choose the vendor with which you want to merge the others.
- Click “Merge.”
- Confirm the action by selecting “Yes.”
- Once the merge is complete, you will see a message stating “Merge Complete.” Click “OK.”
Option 2: Merging Vendors in QuickBooks Desktop Enterprise?
To merge vendors in QuickBooks Desktop Enterprise, follow these steps:
- Open QuickBooks Desktop Enterprise.
- Access the “Company Menu.”
- Click on “Accounting Tools.”
- Choose the option to merge vendors.
- In the “Merge Vendors” window, select each vendor you want to merge.
- Click “Next.”
- Select the “Master Vendor” to merge the others into.
- Click “Merge.”
- Confirm the merge by clicking “Yes.”
- Once the merge is complete, a message will appear indicating the successful merge. Click “OK.”
How to Merge Vendors in QuickBooks Online?
Merging vendors in QuickBooks Online is a straightforward process. Follow these steps to merge vendors and streamline your vendor list:
- Access the “Expenses” menu in QuickBooks Online.
- From the list of options, select “Vendors.”
- Choose the vendor name that you want to merge and click “Edit.”
- Make changes to the vendor’s “Title,” “First Name,” “Last Name,” “Middle Name,” and “Suffix” to match the desired vendor profile. Ensure that the name and “Display Name” are identical.
- Save the changes and confirm the merge by clicking “Yes.”
It’s important to remember that merging vendor profiles in QuickBooks Online is a permanent action and cannot be reversed.
How Do I Merge Two Vendors in QuickBooks?
If you have duplicate vendors in QuickBooks and want to merge them, follow these steps:
- Open QuickBooks.
- Click on the “Expenses” tab.
- Select “Vendors” from the menu.
- Locate the vendor profile you want to keep and open it.
- Click “Edit” to access the vendor’s details.
- Take note of the vendor’s “Display Name” and “Company” name.
- Return to the “Vendors” tab.
- Find the vendor you wish to merge and select it.
- Click “Edit” to make changes to the duplicate vendor’s profile.
- Update the “Display Name” and “Company Name” to match the desired vendor profile.
- Save the changes.
- Confirm the merge by clicking “Yes.”
Merging vendor profiles in QuickBooks will permanently consolidate the two profiles into one. The older transactions associated with the duplicate vendor will be moved to the remaining profile.
You May Read Also : QuickBooks Auto Data Recovery
Conclusion
With QuickBooks’ user-friendly interface and robust tools, merging vendors can be a relatively straightforward process that contributes to enhanced productivity and improved financial management. By leveraging this feature, businesses can optimize their vendor management practices and focus on other critical aspects of their operations, ultimately driving growth and success.