

Managing your business finances efficiently is crucial, and when it comes to integrating Amazon purchases with QuickBooks, it couldn’t be simpler. The Amazon Business Purchases app offers a seamless solution, allowing you to connect your Amazon Business account to QuickBooks, facilitating the import of purchase details for effortless financial management.
What Are the Steps for QuickBooks Amazon Integration Online?
Before we delve into the steps for QuickBooks Amazon Integration Online, please take note of an important update – starting from March 13, 2023, you will need to re-establish the connection between the Amazon Business app and QuickBooks due to service enhancements by Amazon Business. Rest assured, the app itself remains unchanged, ensuring a consistent and reliable experience.
Now, let’s get started with the integration process –
- Begin by accessing your QuickBooks account as an administrator.
- Within QuickBooks, locate the Amazon Business Purchases app. This is where the magic happens.
- Click on the option to “Get the app now” to initiate the integration process.
- For a seamless connection, sign in to your Amazon Business account using your primary admin credentials.
- Select the date from which you want to import your Amazon Business purchase data into QuickBooks. This allows you to start with a clean and accurate financial record.
- After confirming your preferences, click on the “Finish” button to kickstart the integration process.
After following these steps, the Amazon Business Purchases app will efficiently bring in all your Amazon Business purchases into QuickBooks. Additionally, it’s designed to ensure that your financial data stays current, automatically syncing the most recent transactions once per day.
Integrating Amazon and QuickBooks online
Efficient financial management is at the core of any successful business, and integrating your Amazon purchases with QuickBooks Online has never been easier. With the Amazon Business Purchases app, you can seamlessly connect your Amazon Business account to QuickBooks Online, making the import of purchase details a breeze.
Before we delve into the steps for Amazon QuickBooks integration, it’s important to note an upcoming change. This change is in response to service updates by Amazon Business, while the app itself remains unchanged, assuring you a consistent experience.
Now, let’s walk through the integration process step by step –
- To begin, log in to your QuickBooks Online account with administrative credentials.
- Inside QuickBooks Online, you can find the Amazon Business Purchases app. This serves as your entry point for a smooth integration experience.
- Find and click on the option to “Get the app now” to initiate the integration process.
- For a smooth connection, sign in to your Amazon Business account using your primary administrator credentials.
- Select the starting date from which you wish to import your Amazon Business purchase data into QuickBooks Online. This helps you maintain a clean and accurate financial record.
- After confirming your preferences, simply click on the “Finish” button to kickstart the integration process.
Once these steps are completed, the Amazon Business Purchases app will diligently import all your Amazon Business purchases into QuickBooks Online. The beauty of this integration is that it doesn’t stop here; it ensures your financial data is kept up to date. The latest transactions are automatically synced with QuickBooks Online once a day.
In essence, this integration streamlines your financial management. QuickBooks Online categorizes and links your Amazon purchases to your bank or credit card transactions. All that remains is for you to review and approve the imported data, keeping your finances impeccably organized.
QuickBooks and Amazon Seller Central Integration
Discover how to seamlessly integrate QuickBooks with Amazon Seller Central and revolutionize your financial management as an Amazon seller. It’s a game-changer, and we’ll guide you through the process step by step.
- Begin your integration journey by logging in to your QuickBooks Commerce account. Make sure you’re all set and ready to streamline your finances.
- Within QuickBooks Commerce, explore the “Browse Apps” section and look for the Amazon integration option.
- Select the “Install app” button to initiate the integration process.
- A drop-down menu will appear; here, choose your primary marketplace ID from the options available. Once selected, click “Continue.”
- To allow QuickBooks Commerce to establish a connection with your Amazon account, select “Agree.” If you’re not already signed in to your Amazon account, you’ll be prompted to sign in at this stage.
- Click “Continue” to proceed with the integration. Then, click “Next” to move forward in the process.
Important note – Please note that these steps are specifically tailored for QuickBooks Commerce users with an active Online QuickBooks Subscription. QuickBooks Commerce is not available as a standalone product.
Amazon QuickBooks Self-Employed Integration
Managing your business transactions just got easier with Amazon QuickBooks Self-Employed integration. Follow these straightforward steps to seamlessly link your Amazon account and streamline your financial record-keeping.
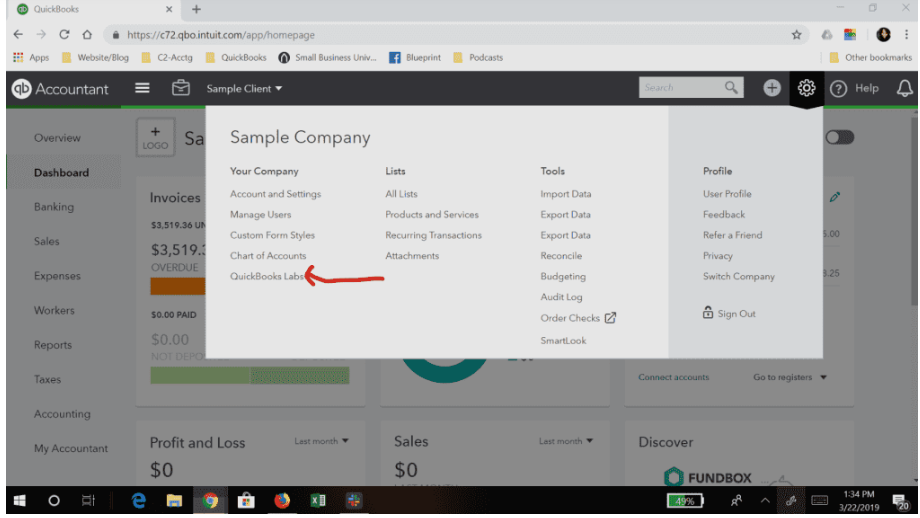
- Start by clicking on the gear icon positioned in the top right corner of your QuickBooks Self-Employed screen.
- From the dropdown menu, choose the option called “QuickBooks Labs.” This is where the exciting features begin.
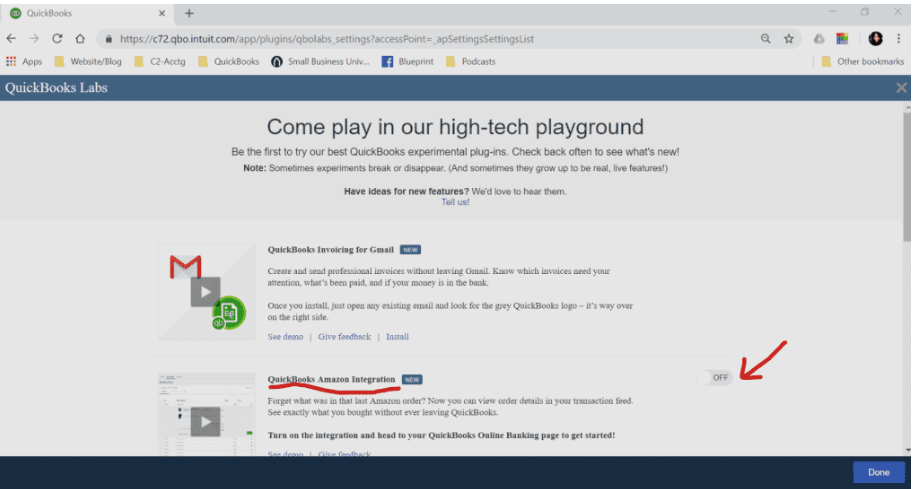
- Inside QuickBooks Labs, search for the option marked as “Turn It On” associated with the QuickBooks Amazon Integration. Click on it to enable the integration.
- After activating the integration, you’ll see an option named “QuickBooks Amazon Integration.” Click on this option to initiate the setup process. Click on this option to proceed with the setup.
- At this stage, you will be prompted to enter your Amazon login credentials. This ensures a secure and accurate connection between your Amazon account and QuickBooks Self-Employed.
- After entering your Amazon login details, simply allow the system to complete the connection process. QuickBooks Self-Employed will take care of the rest, ensuring that your Amazon transactions are seamlessly integrated into your financial records.
With these simple steps, you’ll gain greater control over your business finances, making transaction categorization a breeze. By connecting Amazon to QuickBooks Self-Employed, you’ll save time and effort, leaving you with more energy to focus on growing your business.
How to Prevent Duplicate Income Entries with QuickBooks Amazon Seller Integration?
In today’s digital age, managing your finances efficiently is crucial for any business. If you’re an Amazon seller, integrating your Amazon account with QuickBooks Online can be a game-changer. It allows you to seamlessly record your Amazon transactions in QuickBooks, eliminating the risk of double income entries and ensuring your financial records remain accurate and up-to-date.
Here’s a step-by-step guide to help you integrate your Amazon account with QuickBooks Online –
- Begin by logging into your QuickBooks Online account. Once you’re in, navigate to the Banking App Menu. This is your gateway to syncing your Amazon transactions with QuickBooks.
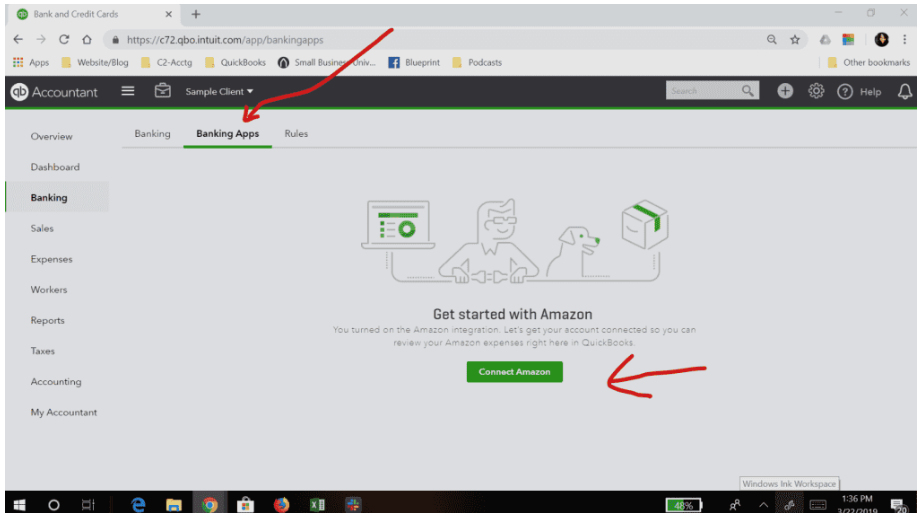
- In the Banking App Menu, locate and click on the “Banking” button. This action will open up a new window where you can view and manage your transactions.
- Now, it’s time to review the transactions listed in your QuickBooks account. Look for any Amazon transactions that need analysis or review. QuickBooks Online provides you with detailed information about these transactions, including what was purchased and when.
- To avoid double income entries, you’ll want to exclude any duplicate transactions. QuickBooks Online makes this process straightforward. Simply select the transactions you wish to exclude, and then click on the “ignore” or “exclude” button. This action will remove the selected transactions from your records, ensuring you don’t double-count your Amazon income.
By following these simple steps, you can seamlessly integrate your Amazon seller account with QuickBooks Online and maintain accurate financial records. This integration not only saves you time but also enhances the clarity and organization of your financial data.
Managing GL Codes in Amazon QuickBooks Integration Online
Efficiently managing your finances with Amazon Business and QuickBooks can sometimes come with a limitation – the restriction of selecting only one code for the general ledger to categorize your entries.
It’s important to note that this limitation is not imposed by QuickBooks but rather by the developers of Amazon Business. However, there are ways to work around this constraint and ensure your financial records remain organized and accurate.
- For now, one way to address the limitation is by manually matching and checking the GL (General Ledger) codes in Amazon QuickBooks. This means that when recording your transactions, you’ll need to ensure that the GL code chosen in QuickBooks aligns with the appropriate category in your Amazon Business transactions. It may require some extra effort, but it’s a practical workaround to maintain accurate financial records.
- If your business utilizes various methods of payment for Amazon transactions, consider setting up specific expense accounts for each payment method within QuickBooks. This approach allows you to categorize transactions more precisely, even if you can only select one GL code from Amazon Business. This way, you can gain a deeper insight into your expenses based on payment methods.
- It’s essential to communicate your concerns and needs as a user. To do this, navigate to the transaction page of the Amazon Business application and tap on the settings tab of the app. While the current limitation is set by Amazon Business developers, sharing your feedback can potentially influence future updates and improvements. Your input matters and it’s a proactive way to contribute to the development of the platform.
In conclusion, the integration of Amazon and QuickBooks represents a powerful tool for businesses seeking to streamline their finances efficiently. This dynamic partnership empowers users to effortlessly track transactions, manage expenses, and maintain accurate financial records.
Throughout this article, we’ve explored the seamless process of linking your Amazon account to QuickBooks Online, eliminating the risk of double income entries, and offering strategies for handling GL code limitations effectively.
Frequently Asked Questions
What is QuickBooks Amazon Integration, and how can it benefit my business?
QuickBooks Amazon Integration is a feature that allows Amazon sellers to connect their Amazon accounts with QuickBooks Online, streamlining the recording of sales, expenses, and other financial transactions. This integration can benefit your business by reducing manual data entry, improving accuracy, and providing real-time insights into your Amazon-related finances.
How do I set up QuickBooks Online Amazon Integration for my Amazon seller account?
Setting up QuickBooks Online Amazon Integration involves logging into your QuickBooks Online account, navigating to the Banking or Transactions section, and connecting your Amazon seller account by following the integration wizard. Detailed step-by-step instructions are typically available in the integration setup process.
What are the key features of Amazon QuickBooks Online Integration for sellers?
Key features include automatic synchronization of sales and expenses, categorization of transactions, tracking of Amazon fees, real-time financial reporting, and the ability to reconcile your Amazon transactions with your bank accounts in QuickBooks Online.
Can I sync my Amazon Seller Central account with QuickBooks Online for seamless financial management?
Yes, you can sync your Amazon Seller Central account with QuickBooks Online. This integration allows you to effortlessly manage your Amazon-related financial data, saving you time and reducing the risk of errors in your financial records.
What are the steps to connect Amazon FBA with QuickBooks Online?
The steps typically involve accessing the Amazon Integration settings within QuickBooks Online, authorizing the connection to your Amazon FBA account, selecting the desired synchronization options, and completing the setup process. Specific steps may vary based on updates and changes to the integration.
How can QuickBooks Online streamline my financial transactions from Amazon sales?
QuickBooks Online streamlines your Amazon sales transactions by automatically importing them, categorizing them, and providing you with detailed financial reports. This eliminates the need for manual data entry, reduces errors, and ensures your books are always up-to-date.
Are there any limitations or restrictions to consider when using Amazon and QuickBooks integration?
One common limitation is that you may need to manually match General Ledger (GL) codes in QuickBooks with your Amazon transactions, as Amazon typically allows only one GL code for categorization. Additionally, you should stay updated on any changes in integration features and requirements.
What’s the difference between Amazon QuickBooks Integration and Amazon Seller Central QuickBooks Integration?
Amazon QuickBooks Integration generally refers to the broader capability of connecting your Amazon account with QuickBooks Online. Amazon Seller Central QuickBooks Integration may specifically refer to the integration options available within Amazon Seller Central. It’s essential to clarify the context when discussing these terms.
How can I resolve common issues or errors when integrating Amazon with QuickBooks Online?
To resolve common issues or errors, you can start by checking the integration setup, ensuring that all permissions are granted, and verifying that your Amazon and QuickBooks accounts are up-to-date. Additionally, seeking support from QuickBooks or Amazon’s customer support teams can be helpful.
Are there any best practices for optimizing Amazon and QuickBooks integration to improve financial reporting and analysis?
To optimize integration, consider setting up clear GL code mapping, reconciling your accounts regularly, and using reports in QuickBooks Online to gain insights into your Amazon sales and expenses. Keeping accurate records and staying organized will greatly enhance your financial reporting and analysis capabilities.
Read also: How do I Delete Inventory Items in QuickBooks Online?