
If you’re using QuickBooks Online to manage your business finances, you’ll likely come across the need to print Checks in Quickbooks. Printing checks directly from QuickBooks Online can save you time and effort, ensuring accuracy and professionalism in your payment processes. In this article, we will walk you through the steps to confidently print checks in QuickBooks Online, ensuring a seamless experience.
Let’s explore a blueprint of this post on how to print checks in quickbooks, highlighting step-by-step instructions for different scenarios.
How to Print Checks in QuickBooks Online?
Printing checks in QuickBooks Online is a hassle-free process. Follow these step-by-step instructions:
- Ensure that you are on the “Homepage” of QuickBooks.
- Select the “Quick Create” icon.
- Choose “Vendors” from the options.
- Click on “Check”.
- Enter the required information in the check fields, ensuring accuracy in the amount.
- Select the appropriate accounts for crediting and debiting.
- Once again, click on the “Quick Create” icon.
- Choose “Vendors”.
- Select the option of “Print Check”.
- Utilize the “Alignment Wizard” to make any necessary adjustments.
- Click on “Finish Preview”.
- Finally, tap on “Print”.
How to Print Checks in QuickBooks Desktop?
QuickBooks Desktop provides two distinct ways to print checks in Quickbooks: one for printing individual checks and another for printing multiple checks or checks in batches.
Option 1 – Printing an Individual Check
To print an individual check in QuickBooks Desktop, follow these steps:
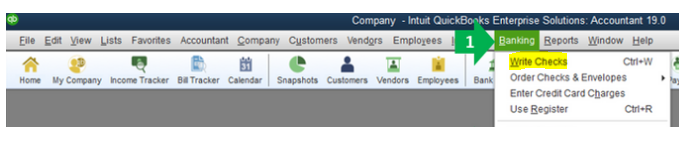
- Ensure that QuickBooks Desktop is running on your screen.
- Select the “Banking” menu.
- Choose the “Write Checks” option.
- Locate the check you wish to print.
- Fill in the “Check Number” field if necessary.
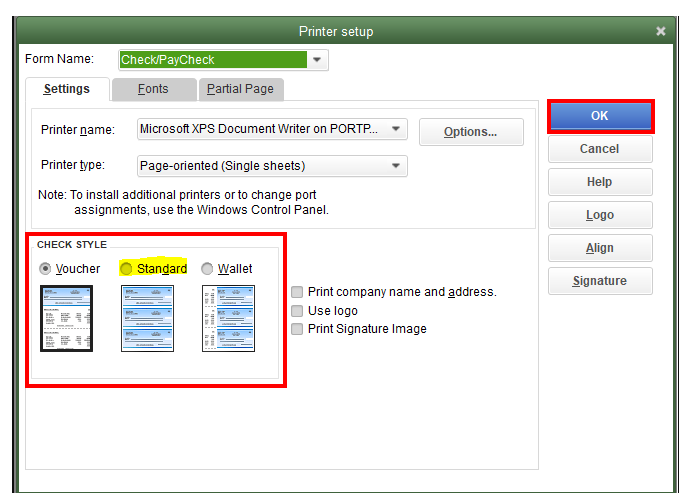
- Press “Print”.
- Select one of the available check styles: “Voucher,” “Standard,” or “Wallet”.
- Choose your printer.
- Click on the “Print” button.
Option 2 – Printing Multiple Checks or Checks in Batches
To Print checks in Quickbooks Desktop in batches, follow these steps:
- Launch QuickBooks Desktop.
- Click on “Banking”.
- Select “Write Checks”.
- Choose the “Print Later” option for each check you want to print.
- Close the “Write Checks” window.
- Go to “File”.
- Click on “Print Forms”.
- Select the desired option: “Checks” or “Paychecks”.
- Choose the appropriate bank account for check payment.
- Mark the checkboxes for every check you want to print.
- Provide the “Check Number”.
- Select the check style.
- Click on the “Print” button.
Note: Ensure that you customize the instructions according to your specific version of QuickBooks and any personalized settings you may have.
How to Print Payroll Checks in QuickBooks Online: A Step-by-Step Guide?
Printing payroll checks in QuickBooks Online is a straightforward process that varies depending on the version of the software you are using.
In this section, we will provide you with clear instructions for printing payroll checks in different versions of QuickBooks Online, including QuickBooks Online Payroll, QuickBooks Online Payroll Enhanced, Intuit Online Payroll Enhanced, and Intuit Online Payroll Full Service.
Option 1: Printing Payroll Checks in QuickBooks Online Payroll
Follow these steps to print payroll checks in QuickBooks Online Payroll:
- Go to “Settings” in QuickBooks Online.
- Select “Payroll Settings”.
- Click on the “Edit” icon in the “Printing” section.
- Choose “Preprinted QuickBooks-compatible Check Paper”.
- Select either “Print 1 Pay Stub” or “Print 2 Pay Stubs” as per your preference.
- Click “Save” and then “Done”.
- Go to the “Payroll Menu” and select “Employees”.
- Click on “Paycheck List” under “My Payroll”.
- Choose the paychecks you want to print.
- Press “Print”.
Option 2: Printing Payroll Checks in QuickBooks Online Payroll Enhanced
For QuickBooks Online Payroll Enhanced users, here’s a 10-step process to print payroll checks:
- Click on “Settings” in QuickBooks Online.
- Choose “Payroll Settings”.
- Click on “Paycheck Printing” under “Preferences”.
- Opt for “Preprinted QuickBooks-compatible Voucher Check Stock”.
- Select either “Print 2 Stubs” or “Print 1 Stub” based on your preference.
- Click “Ok”.
- Navigate to the “Payroll” menu and select “Employees”.
- Click on “Paycheck List” under “My Payroll”.
- Select the paychecks you wish to print.
- Press “Print”.
Option 3: Printing Payroll Checks in Intuit Online Payroll Enhanced
If you are using Intuit Online Payroll Enhanced, follow these steps to print payroll checks:
- Click on “Setup” and then choose “Preferences”.
- Click on “Paycheck Printing Settings”.
- Select “Preprinted QuickBooks-compatible Voucher Check Stock” or “Blank Check Stock”.
- Choose either “Print 2 Stubs” or “Print 1 Stub”.
- Click “Ok”.
- Now select “Payday”.
- Click on “Paycheck List” and choose the paychecks you want to print.
- Click on “View Print” and then the printer icon to proceed with printing.
Option 4: Printing Payroll Checks in Intuit Online Payroll Full Service
For Intuit Online Payroll Full Service users, follow these steps to print payroll checks:
- Set up your printing preferences.
- Click on “View Paycheck List”.
- Select all the paychecks you wish to print.
- Click on the “Print” tab.
- Press the printer icon to initiate printing.
After following these steps, your payroll checks will be printed. Ensure that the prints are clear and accurate by reviewing them.
How to Print Voucher Checks in QuickBooks Online without Voucher Portion?
Printing voucher checks in QuickBooks Online without the voucher portion is a simple process. Follow the steps outlined below to achieve this:
Step 1 – Select New and Print Checks
- In QuickBooks Online (QBO), click on “New”.
- Choose “Print Checks”.
Step 2 – Set Up Printing
- Click on “Print Setup”.
- Select the “Standard” option.
- Click on “Yes, I’m Finished with Setup”.
Step 3 – Print the Check
- Press the arrow below “On First-page Print”.
- Choose the option to print one check.
- Select the check you want to print.
- Finally, click on the “Print” button.
How to Print a Paper Check in QuickBooks Online Payroll?
To print a paper check in QuickBooks Online Payroll, follow the steps provided:
Step 1 – Access Payroll
- Click on the “Employees” or “Payroll” menu in QuickBooks Online.
- Select “Run Payroll”.
Step 2 – Choose Pay Schedule and Employee
- Choose the appropriate pay schedule if multiple schedules are in use.
- Click “Continue”.
- Locate the employee by clicking on the “Direct Deposit” icon.
Step 3 – Select Paper Check
- Click on “Paper Check”.
- Enter the required information for the employee’s paycheck.
Step 4 – Preview and Submit Payroll
- Select “Preview Payroll”.
- Review the details and ensure accuracy.
- Select the “Submit Payroll” option
Step 5 – Provide the Cheque Number and Print
- Enter the cheque number (required if using blank cheque stock).
- Click on “Print Pay Cheque”.
- Note: This option is available after selecting the printing method.
- Alternatively, you can choose “Print Pay Stub” to print the pay stub separately.
- Note: This requires manual handwriting of the check.
- Finally, click on “Finish Payroll”.
How to Adjust Check Printing Alignment in QuickBooks Online?
Printing checks in QuickBooks Online can sometimes result in alignment issues if the alignment settings were not properly configured beforehand. In this section, we will guide you on how to adjust check printing alignment in QuickBooks Online. By following these steps, you can ensure that your checks are printed accurately and aligned correctly.
Step 1 – Access Transactions and Expenses
- Open QuickBooks Online (QBO) and navigate to the left panel.
- Select “Transactions”.
- Choose “Expenses”.
Step 2 – Select Print Checks
- At the top-right corner, click on the “Print Checks” or “Cheques” button.
Step 3 – Access Print Setup
- Select “Print Setup”.
Step 4 – Continue Setup
- Click on the “No, Continue Setup” button.
- On the subsequent screen, click “No, Continue Setup” again.
Step 5 – Fine-tune Alignment
- The page for “Fine-tune Alignment” will appear.
- Drag the grid box to the location indicated by the dollar amount.
Note – Adjustments made here will modify both horizontal and vertical alignment.
Step 6 – Print Sample Check
- At the bottom-left, select “View Preview and Print Sample”.
- Click on the “Print” icon in the print preview.
- A sample check will be printed on plain paper.
- Verify that the alignment of the sample check is correct.
Note – If the alignment is not satisfactory, you can fine-tune it by following the note instructions.
Step 7 – Finish Setup and Apply Changes
- Select the “Finish Setup” option.
- Make the following changes and apply them:
- Set “Page Scaling” to “None”.
- Ensure that the options “Center” and “Auto-Rotate” are unchecked.
- Choose the option “Choose Paper Source by PDF Page Size”.
- If using Adobe 10.1.2:
- Select “Actual Size” under “Page Size & Handling”.
- Choose “Choose Paper Source by PDF Page Size”.
- Click on “Auto Portrait/Landscape” under “Orientation”.
Step 8 – Print the Check
- Once the alignment has been correctly adjusted, proceed with printing the check.
Note – Users of “Chrome” may encounter alignment issues in the bottom half of the checks. To resolve this, disable “Chrome PDF Viewer” and enable “Adobe PDF Plug-in for Firefox and Netscape” in the Chrome Plugins list. Ensure the settings match the instructions in Step 14.
By following these steps, you can effectively align check printing in QuickBooks Online. Ensure the accuracy of your checks by fine-tuning the alignment and adjusting the printing settings accordingly.
Printing checks in QuickBooks Online provides a convenient and efficient way to manage your payment processes. By following the steps outlined in this article, you can easily set up check printing, create checks, and print them directly from your QuickBooks Online account. The ability to customize check layouts, include bank account information, and print on pre-printed check stock adds a professional touch to your business transactions.
Also read: Comprehensive Guide to Update QuickBooks
Frequently Asked Questions
What if I make a mistake on a printed check?
If you make a mistake on a printed check, you can void it in QuickBooks Online and create a new check with the correct information.
Can I customize the appearance of printed checks?
Yes, you can customize the appearance of printed checks by creating a custom style in QuickBooks Online, as explained in the earlier steps.
Is it possible to print checks in Quickbooks on pre-printed check stock?
Yes, QuickBooks Online allows you to print checks in Quickbooks on pre-printed check stock. You can configure the check layout to match your pre-printed checks during the setup process.
How to align check printing in QuickBooks Online?
In QuickBooks Online, go to “Settings” > “Payroll Settings” > “Paycheck Printing” > “Align Checks” and follow the instructions.
How to print a check stub in QuickBooks Online?
Open the check details, click “Print,” and choose “Print Check Stub” to print the check stub in QuickBooks Online.
How to align check printing in QuickBooks?
For check printing alignment in QuickBooks, follow the alignment instructions provided in the software.
How to pay bills and print checks in QuickBooks?
In QuickBooks, pay bills by selecting “Pay Bills” from the “Vendors” menu, then print checks using the “Print Checks” option.
How to print check details in QuickBooks Online?
Print check details in QuickBooks Online by opening the transaction list, selecting the check, and clicking “Print Check Detail.”
How to print check stubs in QuickBooks?
To print check stubs in QuickBooks, open the check details, click “Print,” and choose “Print Check Stub” from the drop-down menu.
How to print check vouchers in QuickBooks?
In QuickBooks, print check vouchers by opening the check details and selecting the “Print Check Voucher” option.
How to print multiple checks in QuickBooks Online?
Print multiple checks in QuickBooks Online by selecting the checks you want to print, clicking “Print,” and following the on-screen instructions.
How to adjust check printing alignment in QuickBooks Online?
Adjust check printing alignment in QuickBooks Online by accessing the alignment settings under “Settings” > “Payroll Settings” > “Paycheck Printing” > “Align Checks.”
How to print checks in reverse order in QuickBooks?
To print checks in reverse order in QuickBooks, adjust the printer settings to print in reverse order before initiating the print job.